 Version 3.0
Windows 98, Me, 2000, XP, Vista, 7, 8
The program Flügel-Index
is used for the examination of characteristics of honey bees.
Cubitalindex,
Hantelindex and Discoidalshift are measured in the wings of the bees.
50 wings are
scanned, one wing after another, enlarged and measured by click on 8 measuring
points.
New
ü
Easier and clearer
handling of the program
ü
Topical instructions
in the red footer
ü
Higher resolution of
the wing-pictures
ü
Results are saved in
a data base → clear administration of the results
ü
Results of
examinations with former versions can be imported
ü
English
installation-program
Flügel-Index-Demo 8,3 MB - It is possible to use this 30 day demo 10
times
Operating
modes
·
All
measurements
·
Over
hair not measured – in this case the discoidalshift is judged instead of over
hair
·
Only
Cubitalindex
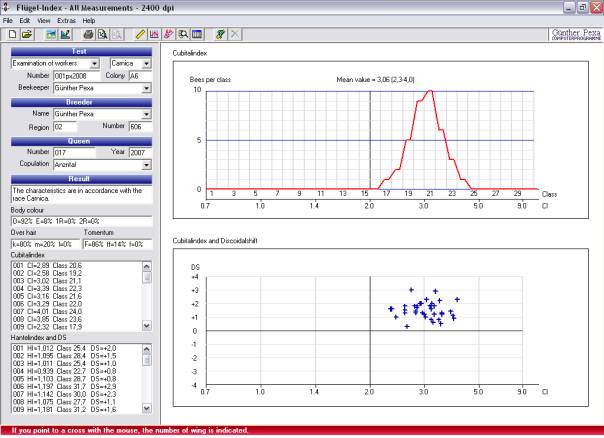
Presentation of the results
The program calculates the indexes and draws:
·
the curve
Cubitalindex - Number of the bees per class,
·
the diagram
Cubitalindex and Discoidalshift and
·
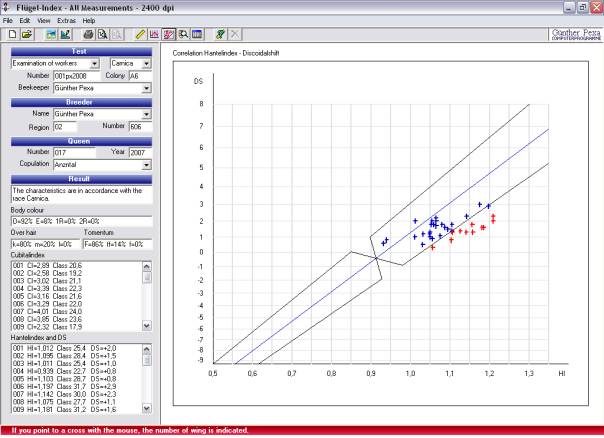
the Correlation
of Hantelindex and Discoidalshift.
Hard and software
requirements
Personnel computer
Flügel-Index works with very large files.
Therefore a high-quality computer should be used – otherwise the operation
times become very long.
Screen size at
least 800 x 600.
Operating system Windows 98, Me, XP, NT, 2000
or Vista.
With the
operating system Windows 7 use the XP- mode:
1. After the installation click with the right
mouse-button to the program and choose characteristics.
2. Adjust Windows XP.
Scanners
Flat-bed-scanner or slide-scanner. Optical resolution: 2400 x 2400 dpi or higher, min. 600 x 1200
dpi.
Graphic program for scanning the wings.
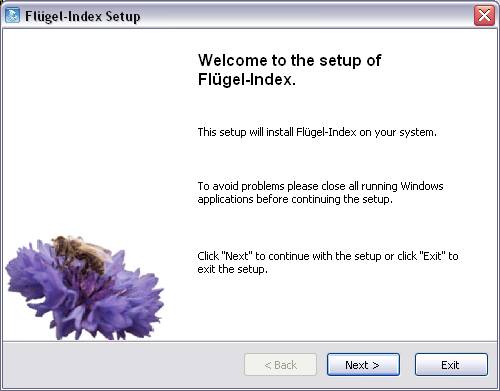
Installation
Close all applications, insert the CD and wait for
automatic start.
Preparing the wings
|
It is recommended to prepare all
wings in the shown direction and very close to each other. In this way you get
a smaller picture file (faster measuring) after scanning. |
|

Method 1
Put some alcohol and sugar into a small bowl. A
simple way is to lift a bee at a front wing with a pair of tweezers, cut off
the wing with small pair of scissors, dip the wing into the liquid and place it
on a crystal-clear, transparent foil (e.g. a overhead
foil).
For flat-bed-scanners, stick
self-adhesive white paper on the preparation (for instance an address-sticker).
for slide-scanner's use crystal-clear adhesive-tape.
With this method, a wing can be
shifted to the right position after it has been put onto the foil.
However, shadows caused by the
liquid can appear in the scanned picture.
Method 2
The wings are cut off in same way, but
they are placed on crystal-clear adhesive-tape.
For flat-bed-scanners, the
preparation is stuck on white paper and for slide-scanner on a transparent
foil.
With
this method, no shadows will appear; but the position of the wings cannot be
adjusted after they have been placed on the tape and it is possible that
deformations of the wings occur.
With a graphics-program, the prepared wings are
scanned and the file is stored on the PC.
Recommended Colour
It is recommended to use 8 bits –
Grey scale B&W, this creates smaller picture files that are processed by
the PC faster.
If the computer has a very large RAM and a
high frequency, you can also use 24 bits - Colour, that generates more
beautiful pictures, but 3 times larger files.
Recommended scanner resolution
·
Screen 800 x 600
– scanner resolution 2400 dpi.
·
Screen 1024 x 768
or more - scanner resolution 3600 dpi.
Since a length and not the relation of two
lengths is measured with the discoidalshift, the adjustment of the resolution of the scanner
and the adjustment at Options must agree! This is not valid if only the
Cubitalindex is measured.
With a high resolution, it can be
necessary to divide the wings into several picture-files. These files are to be
loaded and measured one after the other.
TIP:
In the menu Extras options Picture path of a directory can be
stored. Flügel-Index seeks for
picture-files in this directory first. It is recommended to store the
picture-files in this directory.
You can activate the graphic program in the menu File
or with click to ![]() in
the tool-strip, if the path of the graphic program is stored in menu Extras
options index-card Picture.
in
the tool-strip, if the path of the graphic program is stored in menu Extras
options index-card Picture.
Work flow of an examination
1. Start of a New Examination
By choosing New
in the menu File or ![]() in
the tool-strip, all text fields are cleared and the picture is deleted and a
new Number of Test is generated automatically.
in
the tool-strip, all text fields are cleared and the picture is deleted and a
new Number of Test is generated automatically.
2. Loading of a Picture
In the menu file
or with ![]() in
the tool-strip, the picture is loaded. If several pictures are used, one
picture is measured; afterwards the next picture is loaded.
in
the tool-strip, the picture is loaded. If several pictures are used, one
picture is measured; afterwards the next picture is loaded.
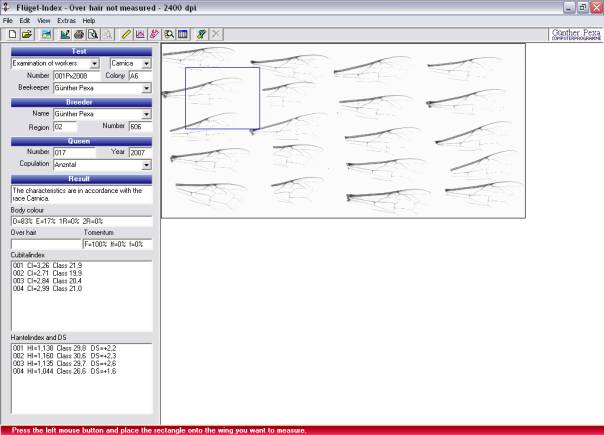
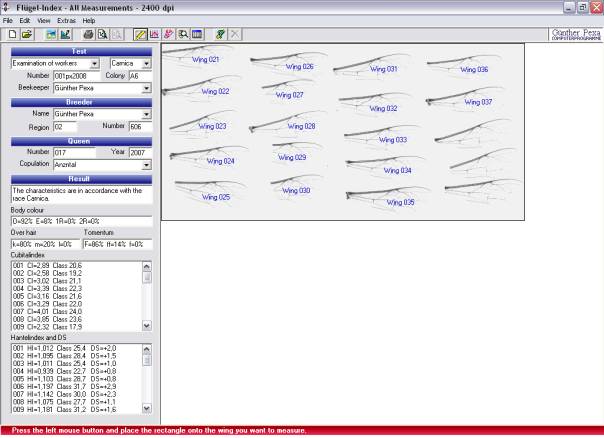
3. Input
of the measuring-points
With the command Measurement
in the menu View or ![]() in the tool-strip, the view Measurement is shown. This is the picture with all wings. With the
mouse the wings can be selected one after another. Press the left
mouse-mouse-button and place the rectangle on the area that should be enlarged
for the purpose of defining the measuring-points.
in the tool-strip, the view Measurement is shown. This is the picture with all wings. With the
mouse the wings can be selected one after another. Press the left
mouse-mouse-button and place the rectangle on the area that should be enlarged
for the purpose of defining the measuring-points.
It is possible either to click onto the
measuring-points in the order of the numbers or to place the cursor on a
measuring-point and press the corresponding number-button.

The Micro-adjustment enables a
shift of a measuring-point with the buttons ABOVE, BELOW, LEFT and RIGHT. The
measuring-point is chosen either by a click or with the buttons CTRL + NUMBER.
A click to the right mouse-button
causes a transfer of the measurement into the lists. Further it is calculated
if the already measured bees match the characteristics of the race.
Now, the picture with all wings is shown again. The already measured
wings are marked with their number.
4. Information about breeder and queen
The name
of the owner, the name of the breeder and the copulation from the last examinations
are offered for selection, if the data base already contains examinations.
Required are:
·
Name of
the breeder
·
Number
of the queen (here, also letters can be used) and
·
Year
(only the last two characters are necessary).
If Region,
Number of the breeder, Number of the queen and Year, are
inserted, the Number of Queen consisting of these four parts will be
stored in the data base.
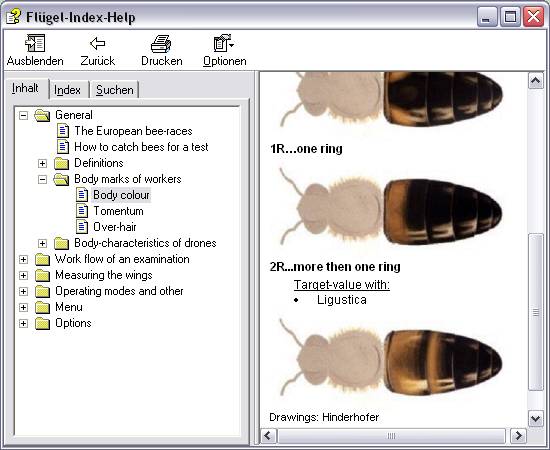
You find a
description of the characteristics in the help file in the chapter General.
The command Body
marks in the menu View or ![]() in
the tool-strip opens the view for the insertion of the body-characteristics.
in
the tool-strip opens the view for the insertion of the body-characteristics.
There are two
possibilities:
Register in the list
For one bee the
characteristics are adjusted and with a click on Add transferred to the
list.
A click on Remove
deletes the activated line from the list.
Enter sums
In this case you
can investigate the body-characteristics without PC.
For the
individual body-characteristics, the number of the bees then is feed into the
corresponding text-field.
A click on Add
All saves all values.
A click on Remove
clears all text-fields.
In both cases the percentage shares are calculated after a click to Add
or Remove and it is calculated if the bees matches the characteristics
of the race.
6. Saving of the examination
There is no
command Save.
·
When finishing Flügel-Index and
·
before a new
examination, Flügel-Index (if the
examination was altered) asks if you want to save the alteration.
After loading a
picture-file, the examination is always saved.
Printing of the protocol
Printing can be
started in the menu File or with ![]() in
the tool-strip. The print-out consists of one or two pages A4 - portrait. This
is adjusted in the menu Extras-Options, index-card Protocol.
The letterhead can be designed in the index-card Letterhead.
in
the tool-strip. The print-out consists of one or two pages A4 - portrait. This
is adjusted in the menu Extras-Options, index-card Protocol.
The letterhead can be designed in the index-card Letterhead.
The content of the protocol depends on the operating mode:
·
All measurements
▪ one page - Cubitalindex and signature
▪ first page. Cubitalindex
▪ second page - diagram Cubitalindex and
Discoidalshift, Correlation and signature
·
Over hair not
measured
▪ one page. Cubitalindex, diagram
Cubitalindex and Discoidalshift and signature
▪ first page. Cubitalindex
▪ second page – diagram Cubitalindex and
Discoidalshift, Correlation and signature
·
Only Cubitalindex
▪ one page - Cubitalindex and signature
Before printing, the protocol can be
tested in the menu File with Preview 1 and Preview 2 or
with ![]() and
and ![]() .
.
Loading of an examination
When opening Flügel-Index, the last examination is
loaded and can be further processed or altered.
A former
examination, for instance in order to print the protocol, can be opened in the
window Results.
Work flow:
1.
Activate the
window Results in the menu View or with ![]() in
the tool-strip.
in
the tool-strip.
2.
Click to the corresponding
line in the table.
3.
Click to the
command Open.
By using the menu Filters only a part of the examinations can be
shown - in the menu Sort the sequence can be changed.
Results, established with former Versions, can be imported in the menu File.
Number of test
For a new examination, the number of
test is given automatically. The number consists of:
1.
a
consecutive number,
2.
the
abbreviation registered at Options (max. 3 characters)
3.
and the
current year.
In the data base, the previous
examination with the highest number in the current year is searched. The next
number is used as consecutive number.
With options index-card General
this function can be switched off. If the number of test is missing, the
examination cannot be stored!